Building an Interactive Weather Application
Overview
In this workshop, you will be guided step-by-step to build a complete and highly interactive weather application. The project uses JavaScript for the frontend to handle the user interface and interactions, along with a simple Node.js (Express) backend to securely communicate with an external weather API.
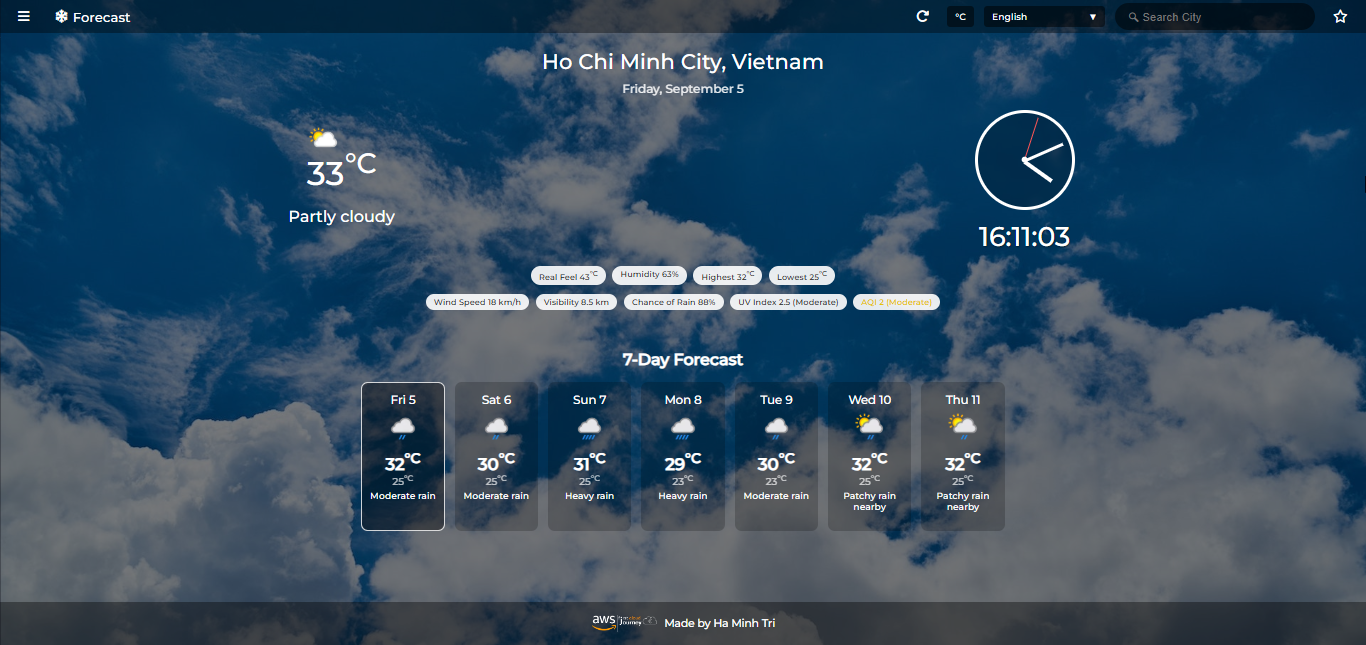
Key Project Features
ℹ️ This application not only displays basic weather information but also integrates many advanced features to provide the best user experience.
💡 Highlight Features:
- Detailed Weather Display: Provides current weather information and a forecast for the next 7 days.
- Smart Search: Automatically suggests locations as the user types.
- Geolocation: Automatically fetches weather data based on the user’s current location.
- Multi-language Support: Supports over 40 different languages, allowing users to choose their preferred display language.
- Save Favorite Locations: Uses
localStorageto save locations that the user is interested in. - Unit Conversion: Easily switch the temperature between Celsius (°C) and Fahrenheit (°F).
- Advanced Metrics: Displays important indices such as Air Quality (AQI), UV index, and chance of rain.
- Dynamic UI: Features randomly changing backgrounds and applies smooth transition effects.
Architecture and Scope
ℹ️ The project is divided into two main parts: the Frontend (client-side) and the Backend (server-side), which communicate with each other via an API.
Frontend (Client-side)
- Responsible for displaying the entire user interface and handling interactions.
main.js: The central file, managing the main flow and events (search, language selection, saving locations).ui.js: Manages updating and displaying data on the DOM (Document Object Model), including the loading skeleton effect.api.js: Sendsfetchrequests to the backend to get weather data and search suggestions.lang.js: Contains translation data and the logic to update static text according to the selected language.favorites.js: Provides functions to manage the list of favorite locations inlocalStorage.clock.js: Logic for both the analog and digital clocks displayed on the interface.animations.js: Contains functions for creating effects (e.g., the number counting animation for the temperature).
🔒 Backend (Server-side)
- Acts as a secure proxy layer between the frontend and the WeatherAPI.
server.js: Built with Node.js and Express, it creates endpoints for the frontend to call./weather: Receives requests from the frontend, then calls the WeatherAPI with the API key secured on the server to fetch weather data./search: Receives search requests, then calls the WeatherAPI to get a list of suggestions.
💡 Let’s start building this exciting project in the upcoming sections!